Sunday, 10 March 2013

When to start planting

Seed Starting & Planting

Timing your seed planting is the key to success.  Plant too soon and you run the risk of a late frost damaging or killing your plants.  Plant too late and you can end up with a smaller harvest due to a shorter growing season.
Naturally, different areas have a different "last frost free date" and that is what you have to go by.  Here in the "banana belt" (southern Vancouver Island) we can often get going much earlier than places in the north or the prairies.  When we lived in the interior of B.C. we usually waited until May 24th to do outside plantings.  That is no longer the date we stick to here in Duncan.  Each area is different and if in doubt I suggest you ask at the local garden shop or  plant Nursery.

Start seeds inside or outside?
If you use your favourite web browser you can find charts to tell you how long it takes to sprout the various seeds and when to do the transplant seedlings you have started inside, out into the open garden.  
When starting seeds inside the house there are a number of things you have to keep in mind.  
* Seeds don't usually need light to germinate (but there are exeptions - primarily some flowers)
*  Seeds have an optimum temperature they like for germination.
*  After seeds have sprouted they need sunlight!  Too little light and they will grow tall looking for the sun.
*  Choose the right starting media & pot size.  If the starter pot is too small and the type of plant grows quickly, you will need to do a re-potting before it is time to plant it out into the garden.  Extra work that you can avoid!
*  Your little plant pots must be kept moist but don't drown the seeds!  
*    Think about how many plants you are going to need before you start seeding.  You will need perhaps 10 - 20% more than what you actually are going to use as some will  not thrive or survive.
*  Consider how much room you have to plant "stuff" out and then think about the cost of the finished item.  For example,  if you don't each much cabbage and you have limited garden space, do you really want to use up your space with something that you can buy at a low price in the store?
*  Before you start, get your materials all figured out.  What kind of tray you are going to use and how to keep it covered.  Yes, I said covered!  Your seedlings will do better in a covered container than just sitting open on a counter or window sill.  A lot of baking goods come in a plastic tray with a clear plastic cover - ideal for starting seeds providing you are not doing a huge number.  If you go to a garden centre you will find there are starter units available at a price.   
*  If you are going to want to start large quantities of seeds you may be interested in building your own plant trays and plant pots - and maybe even a seed germination box.  The latter can be made any size you want and you can purchase a heater cable you bury in sand in the bottom of the box that is thermostatically controlled to keep a nice even temperature for your seeds.  Before we downsized I used to grow a lot of seedlings and made trays out of strips of cedar cut to make trays that would fit in my starter box.  If you do this, make sure you optimize your space by making the trays the right size to fit in the starter box and make the box deep enough to be able to put strips on the inside to put small "planks" on to provide support for a second layer.  Any questions, drop me a note & I will try to answer your questions.
* * * 
Some time back I found a seed chart that I thought was good.   I was going to post it here but this format does not accept PDF files and it is 14 pages long so if you would like a copy post a request in the comments section of my blog and I will e-mail it to you.

* * * 

 What "ZONE" are you in?
It is necessary to know what zone you are in so you can correctly figure out what plants are hardy in your area.
 http://www.veseys.com/ca/en/learn/reference/hardinesszones/alberta
 http://www.veseys.com/ca/en/learn/reference/hardinesszones/britishcolumbia

http://www.veseys.com/ca/en/learn/reference/hardinesszones


The above websites are just a sample of what you can find if you use your browser to search and find what zone you are in.  And if you use the last link, Veseys have a list of zones on the right side of the page.  If you click on the zone you are in they give you a list of all the seeds etc. they can provide for use in your zone.
 
One type of plant that is extremely popular as a "start it yourself" 
 type of seedling is Tomatoes - partly due to the large variety of seeds available and the fact home grown tomatoes always seem to have more flavour than ones bought in the store.  I won't go into any more info on this here as I already have a blog page on tomatoes - take a look at it!

* * * 
Plant Starter Pots
There are many websites showing how to make your own starter pots for next to nothing.  Just "Google" newspaper plant pots and you will get lots of sites to visit.
GG 


Thursday, 7 March 2013

Spring Clean-up Time is Coming!


Spring Cleanup Time  is coming !


Spring is just around the corner - closer for some of us than for others living in the still frozen north.  Here on Vancouver Island we are fortunate to have an earlier spring than most areas.
In our area we are slightly later than in Victoria B.C. where they are already enjoying lots of spring flowers.  Ours are coming along nicely too and some things are already growing.  
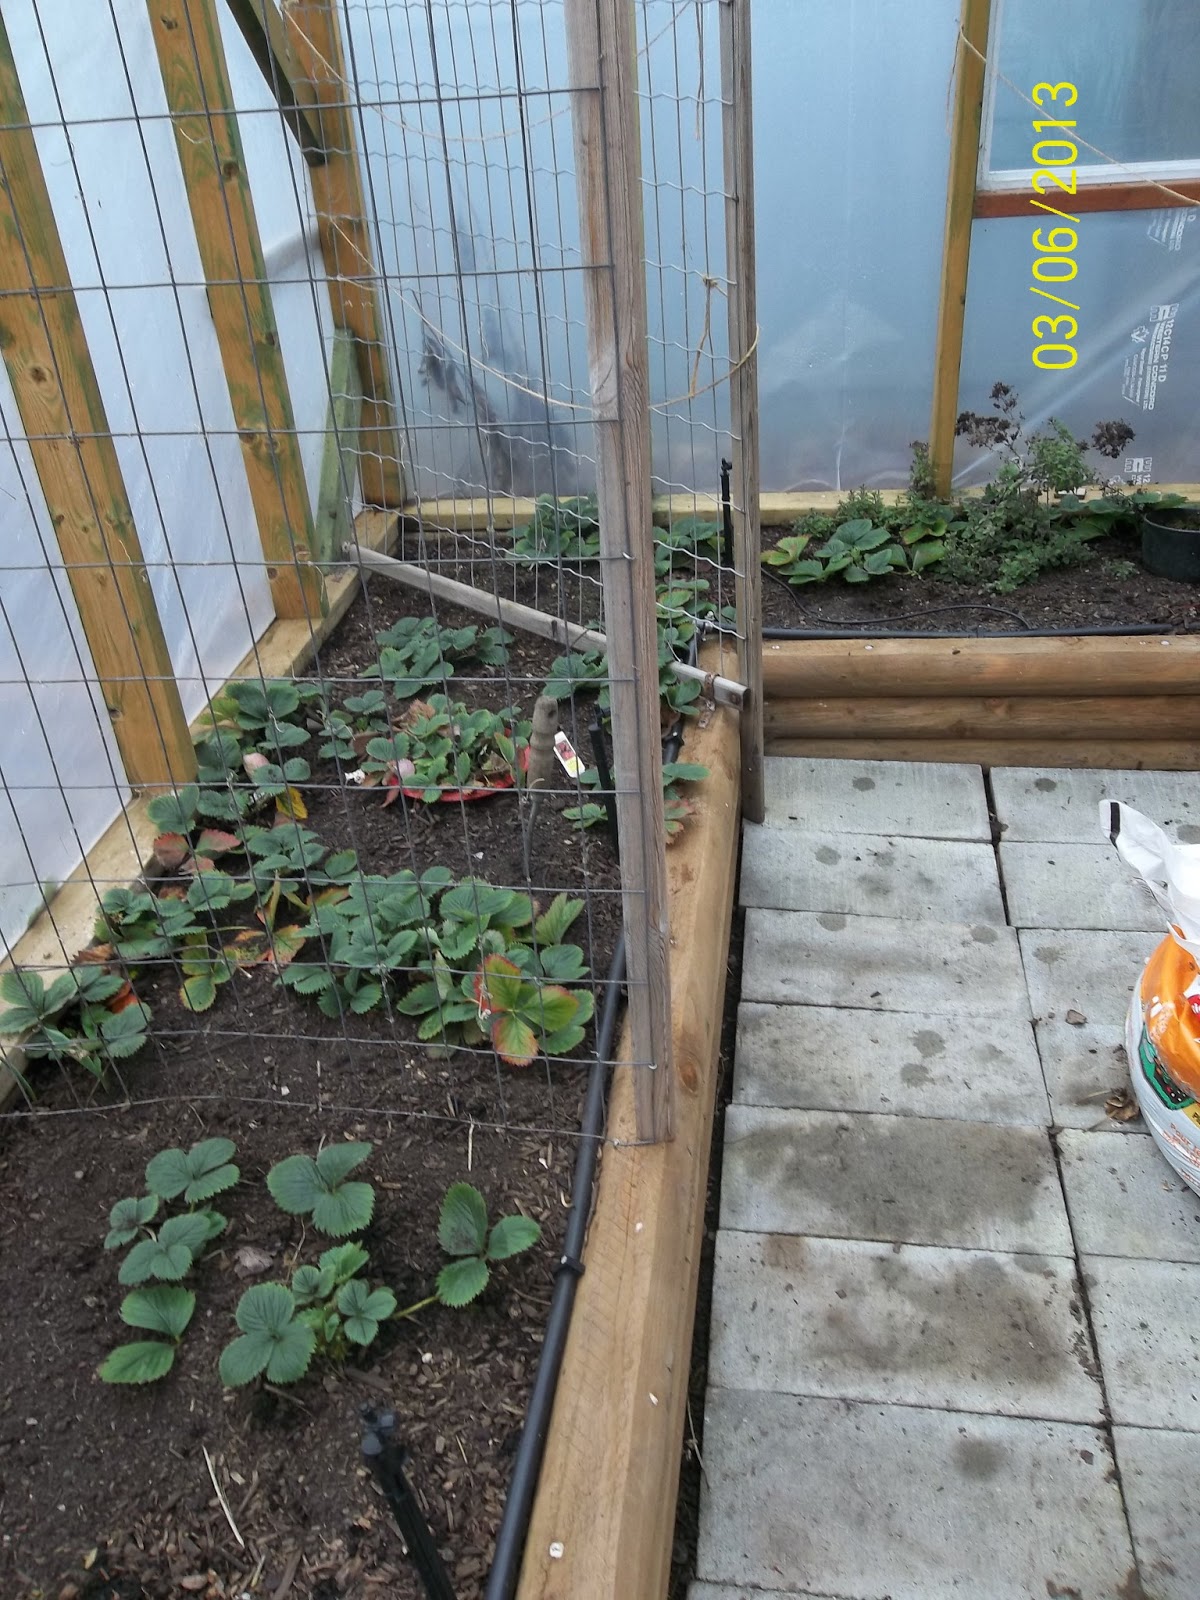
I have been out in the greenhouse and cleaned things up, pulled out the weeds that grew over the winter.  I was amazed to see a couple of pea vines that managed to live over the winter, one of which had a bloom on it.  Unfortunately, the base of the vines were withering away so I just pulled them up and planted more peas in the hopes of having some to eat early.   They are planted at the base of the wire frames.


My strawberry plants inside the greenhouse (unheated) have some flower buds on them and they produced a load of runners so I will have lots of plants this year.  

* * *


The outside strawberry plants look nice and healthy and also produced an abundance of runners so I think I will be giving plants way soon.  If you look closely you can see the acorns all over the place.  As soon as it is dry enough I will be cleaning up all the dead leaves and sorting out which plants to keep and which to give away.  (I am sure the rain will soon stop long enough for the ground to dry up a bit!)

* * *


Speaking of the greenhouse, the one thing that is in there that always does extremely well is the "Egyptian Onions" aka Walking Onions.  I have them in the greenhouse so we can have early green onions.  The bulblets I planted last fall are now at a size they can be harvested. We don't use a lot of green onions so we don't have a big planting - just enough to use a few now and then.   The main plant itself has more than doubled in size and the nice thing is they don't really need to be inside a greenhouse as they will survive nicely over the winter in areas with sub-zero temperatures.  The small onions at the bottom of the picture are just about ready - a little bigger would be OK but small is nice.

* * *

One other thing that did well is the Oak trees in the neighbour's yards.  Yes, I said "yards" - 3 or 4 trees on the south and a huge one on the north - all of them were raining acorns on us last fall and now there are many dozen sprouting all over the place.  In case anyone is interested in growing more Gary Oak trees (endangered species) I have offered the sprouted acorns on our local freecycle/recycle group.

http://groups.yahoo.com/group/cowichanvalleyrecycle/
Many interesting offerings by the group - everything from plants to boats, and it all has to be given away free.  Last fall I gave away a couple of buckets of acorns - one to a lady whose 2 little girls wanted them to feed to the squirrels, the other to a lady who was going to process them into acorn flour.

* * *

 Last fall I left a lot of the oak & maple leaves on the ground in the flower beds - good mulch, and it did it's job so our plants that were covered are now sprouting up nicely.  I raked up the leaves now so insects can't multiply under them, have heaped them on my compost pile in hopes they will eventually rot down. The heather, oriental poppies and day lillies are looking good.

* * *


The raspberry canes have overwintered and thrived.  They do send out shoots for new canes and I notice that two shoots have found their way under the wall of the greenhouse and have come up in there.  (you have to look closely to see them!) Those will be dug up and offered to anyone needing them - on "Freecycle" of course!

* * *


While we were away, the people taking care of our place planted some lettuce... a different variety than we normally grow so we will see how it does. We normally plant a few plants of baby butter from seed.  Just a few seeds planted every couple of weeks can give you a steady supply.

* * *


Talk about a strange looking sight!  I planted some Oregano late last summer and it seems to like the location.  Every branch that touched the ground has sent out roots so this mess can be divided up into a number of plants.  The strawberries were not really invited but the runners just grew all over the place.  If they produce well, then maybe they will get to stay in the place the chose.  In the black pot is a cutting that has rooted OK and is sprouting.  When it gets a little larger maybe we will be able to figure out what we were trying to grow.   One of the problems that comes with age is not remembering what the heck you planted!

 * * *


Thursday, 4 October 2012

Winterizing

Winterizing

 Here on Vancouver Island the weather has been spectacular.  Dry Dry Dry  -  so dry there is a big problem with the amount of water in the Cowichan River.  Warmest, driest August and September on record!  Thanksgiving weekend is coming up here in Canada and it is going to be sunny and then more sun for about another week or so.  At least that is what the weatherman tells us.
With clear skies the temperature drops - especially overnight.  So it is time to start planning for the freezing weather which we are getting a taste of these nights.  Soon it will be freezing harder and lots of damage can be done if the cold is ignored.

As plants die down or are killed by the frost it is important to clean up the debris quickly.  You don't want to leave it laying around for bugs to hide under protected from the cold.

If you have a compost pile, check to see if it is moist or dry.  If too dry it will take too long to break down into compost so you may have to wet it down a bit.  If you are putting leaves in the compost  just keep in mind some types break down very slowly unless they are chopped up.  This is often done the easy way by picking them up with a lawnmower.  If you ave a shredder/chopper that works well for all types of leaves, twigs & small branches, but even on sale a small one is quite expensive.  If you don't have a shredder cut things like corn stalks into short pieces, preferably cutting between each segment so the bacteria can break the stalk down easier.  And don't forget to "turn the pile" - stir it up!

Something new in our area is another recycling step.  We now have a special green bin and all kitchen scraps including bones, fat, greasy cardboard (pizza boxes) go into this and is picked up every week.  This is in addition to the regular recycle bin/can picked up every second week which contains clean plastic, tins & paper.  This kitchen scrap material is taken away and composted and the resulting compost material will be used or sold.  We can now use our compost bin in the garden for plant material and vegetable peelings which don't attract rodents as badly as fruit residue does.

Time to take a really close look at the plants in your garden and decide which ones will not winter over and of those, which ones you want to take inside for the winter.  Some plants and shrubs will overwinter when given some protection like a burlap wrap or for low plants a covering of leaves.  If you are unsure, then go online and check to see what is recommended for the plants your have.  Keep in mind that plants brought inside for the winter - possibly in a heated greenhouse or warm basement - will require less watering than when outside.

Do you save seeds from your garden?  If you do, inspect them carefully for insect damage so you don't accidentally keep the nasties for next year.  Seeds from many flowers will do well next year but keep in mind if the plant is a hybrid then the seed may revert back to something not as nice.  And when it comes to vegetable seeds you can also get cross pollinization.  One year my compost gave me a nice plant that I was sure was from zucchini seeds but when I grew it, it had a vine instead of a bush type plant and the fruit was a cross between zucchini and spaghetti squash.  It was OK but different - it looked like zucchini but the meat inside was in strands like spaghetti.  

And then there are the "volunteers".   I have had good success with volunteer cherry tomatoes in the greenhouse.  They grew from seeds in tomatoes that had dropped off & broke down over the winter.  Again, they may not come "true to type" or in other words they may not be quite like the ones the seed came from.

Time to do the late fall mowing of the lawn and once you have
that done, take a look at your outside faucets and garden hoses.
Disconnect all hoses, drain them and store them for the winter.
This is very important if you have "frost proof" taps/faucets as
the hose could be full of water or partly full, which will mean there
is water between the outside portion of the faucet and the shut-off inside the house.  I made that mistake one year - had a hose that
was connected to the tap and it froze quite hard overnight. 
It didn't hurt the hose but the tap/faucet froze and split.
Even with the "frost proof" type faucet I still like to provide an 
extra layer of protection by using strofoam caps over the taps.

That should have the main work done down to a point that you can now do a cleanup of all flower & vegetable beds.  
And that means HARD LABOUR ...

Keep the linament handy, you might need it, but don't overdo it and injure yourself.  It sure doesn't have to be done all at once!

Keep well
GG


Sunday, 30 September 2012

Pre-winter Cleanup

Pre-Winter Cleanup


The days are getting shorter, less daylight means less heat and the plants are fading away.  In the greenhouse I have cut back the tomato plants to leave just enough to support the last few tomatoes of the year.  Any green ones left will soon be harvested and stored to ripen slowly.  
 My grandpa & Granny Delcourt used to wrap their late green tomatoes in newspaper and store them in boxes to ripen.  The problem with doing that is the need to check once or twice a week to see which ones are ripe enough and also to check for any going bad.  I have  found it is really not necessary to wrap & box them - just put them on cardboard or layers of newspaper a shelf in a cool place and  make sure they are not touching each other.  You can then just walk past and choose the ones that are ripe enough or get rid of any going bad.  
I was going to pull out the purple bush beans but they are still trying to give us a few beans so I will wait until they are finished then pull them up and dig up the soil.  
The carrots are OK where they are until we are ready for them.  They last quite well in the soil as long as there are no bugs eating them.
 From left to right - the edge of the carrot patch, some of the purple bush beans, the new growth of peas and the mass of strawberry runners.


My Egyptian onions (aka Walking Onions - as mentioned on previous blog page) are doing great.  I did pick all the little onion bulblets and planted them out 2 or 3 weeks ago.  They have sprouted up and are doing very nicely.  As a matter of fact a couple that I had planted about a month ago were large enough to pick as green onions, which we did harvest today.


The outside garden looks very barren compared to what it was a month or two ago.  All the squash vines are in the compost as are the bean vines.  Some of the beans that I didn't pull up but only broke them off have re-sprouted and are trying to start all over again.  We will soon be having frost which will do them in.   Next it will be time to turn over the soil for winter, and I guess I will find out if the acorns that are raining down from the big Oak Tree are going to sprout or just become organic boost for the soil.  The picture below is the big Oak Tree that rains acorns and leaves down on the shed & greenhouse.  When the acorns hit the shed roof it sounds like someone is attacking with a sling shot!


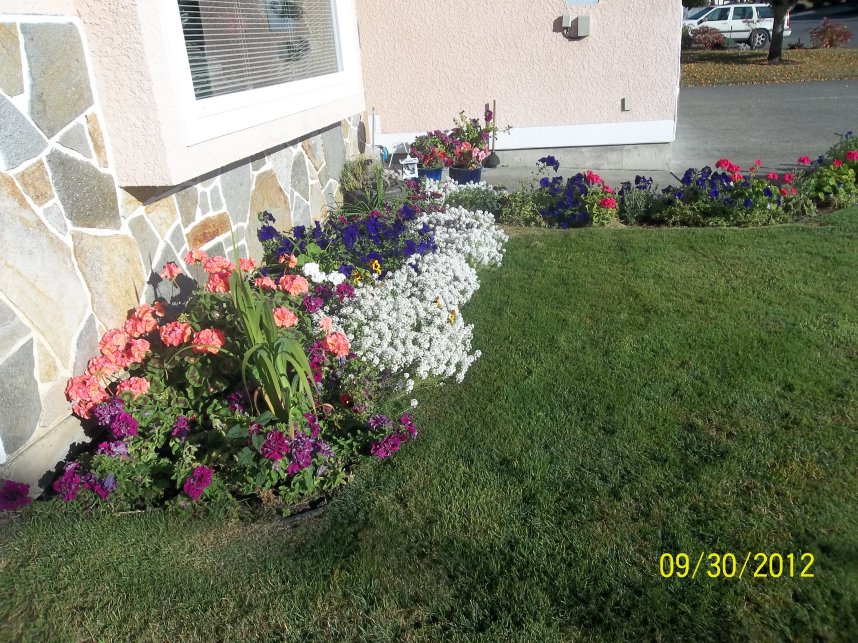
The flower garden at the front of the house has been trimmed back some as some of the petunias were taking over and looking a bit weary.  In their place we have put in some chrysanthemums and the one we planted in the spring is getting ready to bloom.  It will soon be time to take out all the annuals and clean up the beds for winter.  Don't want to leave any trash on the surface for bugs to hide under.

The salmon pink geranium is one huge plant, and the purple petunia is also just one huge plant.  The white Alyssum were just a few small plants in spring but nearly took over the whole bed.

 
Another chore I am not looking forward to is moving our peony plant.  It is hidden behind the end of the greenhouse and is going to be moved to where a hydrangea has been removed.  It didn't do very well so we decided it would be nicer to have the peony out where we can see it. 


Of course there is another problem to deal with - leaves, leaves & more leaves, plus acorns raining down constantly.  When the acorns hit the shed roof it sounds like someone is attacking with a sling shot!  I have found the best way to pick them up is with an aluminum scoop shovel as a rake just doesn't work.  There are at least 3 or 4 Oak trees and a few Maple trees - of course they are the kind with giant leaves.    

The Times Colonist newspaper today (August 30th) stated that August and September were the driest on record.  And the forecast for the next 10 days or so promises more of the same.  When the rains finally come ... they probably won't know when to quit.

The temperature is bound to start dropping soon so it will be time to drain the garden hoses and shut off all outside faucets, then have the irrigation system winterized.  

Regards to all
GG


Sunday, 23 September 2012

Fall Harvest

* Fall Harvest *
And what do you do with all that bounty?

So you had a good growing season and you have produce that you really don't know what to do with.  I am sure many people would love to have that problem.  
As mentioned in previous blogs, there has been a lot of fruit that is being shared through "Cowichan Valley Recycle".  The group operating this site is doing a fantastic job of trying to get people to offer things for free instead of just throwing them away.  Like they say, "one person's trash is another person's treasure" - and some of the items offered by people are weird and/or wonderful.  The website address is -  http://groups.yahoo.com/group/cowichanvalleyrecycle/

Another way of sharing the bounty is offering fruit & veggies to the food bank or to your local senior's centre.  Many seniors have had to move into apartments or condos as they are no longer able to look after gardens, and they really appreciate fresh produce.

OK OK - it is a terrible picture, fuzzy, out of focus due to me not checking the camera settings.  And we ate the biggest one before
I realized the problem.
The biggest tomato in the picture was
17 ounces / a bit over 500 grams.
And it was delicious! 
The remainder will be cut up & preserved.

 I let some of the scarlet runner beans go to seed, the pods shown are drying out and the seed saved for next year.  I will have enough that I will be offering some seeds to anyone on Recycle that wants them.  Many of the beans were over a foot long, but are best picked before the beans start forming inside the pod.
 * * *

 Well, the squash did OK - 2 are missing from the lineup, having been picked & devoured.
The variety is "Sweet Meat", the largest in the picture is about 10" across and 12 lbs.
Janet (gramma & wife) cuts the squash into pieces about 1 2/2" or 40mm in size, trims the hard skin off, steams the pieces then puts them in a pan with brown sugar & butter and bakes them.  They come out tasting like sweet potatoes.
* * *
So that takes us to the abundance of apples and plums, and all the work that was done - as was mentioned on the last blog.  The following will give you a bit of an idea of what was accomplished. 


Jams & Jellies lined up 

all nicely trimmed

ready for Ashley's sale.
 

Complete display 
of all the various items
Ashley made, often with a little
help from "Gramma"

Apple Sauce
Apple Jelly
Apply pie filling 
Apple Butter
Plum Jam
Plum Jelly 
Raspberry Jam
Raspberry Jelly
Blackberry Jam
Blackberry Jelly 


Outside bake sales are 

not always fun

as Ashley found out!


Once you get a bit more organized  

and established things work out a 

bit better.


Another day

Another display

 of "Yummies by Ashley"


with pastry so tender

it melts in your mouth!


* * *
So - now it is up to you!
If you have the produce, time, energy and a little initiative,
you too can cook/bake up a storm and make a little extra money.  

* * *
GG

Friday, 21 September 2012

Indian Summer

Indian Summer

Summer hardly came here on Vancouver Island but fall has been terrific.  We have had a long spell of sunny days and cool nights.  The leaves are turning colour and starting to fall and so are the acorns and when they fall on the roof of my shed from about 50' up they make a noise that is quite startling - especially if you are inside the shed!
There has been a lot of work going on here, cleaning up the garden is only one small chore that was pretty much completed a week or two ago.  As I don't have a chipper/shredder I cut everything into small (about 6") pieces before heaping it on the compost.  The outside bush beans are gone but the ones I planted in the greenhouse very early are still producing.  They will probably go on until the frost gets them.  The variety was "Royalta", a purple bean that turns green when cooked.  We still have some beets and carrots to harvest and a late planting of peas are up about 6" already.  It will be interesting to see if they produce anything.  I guess it will depend on how cold it gets as they are pretty hardy.  The tomatoes are still producing and I guess there are at least 3 dozen good sized ones on the vines with half of those nearly ready to pick.  Some are about 4" across but have cracked at the stem end.  I think I mentioned that in a previous posting.
This is the time of year when one has to consider what to do with all the bounty that is available.
Here on Vancouver Island people have many fruit trees that more or less go wild and the fruit is not always harvested, but instead it just ripens then falls on the ground.  I hate to see this happen so I "shopped around" and found a few people who were willing to share rather than let the fruit go to waste.  I have been taking beans (which I had in abundance plus some donated by others) to the Cowichan Valley Senior's Centre here in Duncan.  The beans are done but now they have been getting plums and apples.
I have a Granddaughter who is really into cooking, preserving and eating healthy.  You may have seen the link to her blog on the right side of this page, which is "Cooking with Jax".  Our other granddaughter (Ashley) who lives here on Vancouver Island is following in her footsteps and I think would like "Jax" to be living closer so she could get together and compare recipes etc.  
Anyhow, Ashley has been working with Gramma Drew and learning the tricks and shortcuts when it comes to making jelly, jam, plum and apple pies and apple sauce.  In addition they produced a lot of apples cut in thin wedges, put in quart sealers and the space filled with a special cinnamon sauce so that all you have to do is make a pie shell and add the filling all ready made.  Yummy!

And if you think the special cinnamon sauce is only good for pie filling - I sure have news for you!
It is terrific on pancakes, waffles, ice cream - you name it!
I think Jax has the recipe for it so if you want it drop her a line.
 * * *

 Gramma and Ashley processing the plums.

After being washed & pitted, they go into the chopper then are cooked & made into jam.

We have also experimented with making what we call "PLUM DELIGHT".  It is sort of like Turkish Delight, or if you have been to Cashmere in Washington State you might have tried "Aplets and Cotlets" which are world famous.  This is a variation on what they make.  Probably not as good as the professionals make but we think they are winners!  (both the cooks and the product!)


 We ended up with two varieties of apples.  Don't ask the name of the variety - all I know is "the price was right!"...

The green ones were larger than the red ones and were firmer when cooked so they made very good pie filling.  The only problem with them was they were uneven shapes so the hand crank peeler didn't work too well.


Nothing earth shattering about this picture - it just shows the apples being cooked down.

Some were made into sauce using a food mill and some went into a cloth bag and hung up to drip the juice to use for apple jelly.  Or just plain juice. 


Another load of apples.  We gave away a couple of bags to a lady in Lake Cowichan who was making sauce for her baby, and the boxfull went to the Senior's Centre to be shared there.


Gramma & Ashley get started on peeling and processing apples.

A few jars of plum jam on counter.


There is a saying that "You can't get too much of a good thing"... well, when it comes to apples and all the work it takes to pick, wash, peel & process,  I can tell you from experience that after a few days of having my thumbs turn brown and cracked from splitting & pitting plums followed by cutting and trimming apples by the bucketful, I was getting to the point of "too much".  Ashley did accuse me of being "like a machine" because I  kept going and going.  At least she didn't call me the Energizer Bunny!


 * * *
GG


Saturday, 8 September 2012

Walking Onions

Walking Onions
aka
Egyptian Onions

At the end of my last post  I said I would do another posting on how lettuce is grown in the desert.
I think I will postpone that - didn't seem to be much response for readers.  So, I offer this instead.
About 70 years ago, my Grandfather was probably growing these onions.  I don't remember it very clearly, but he grew huge leeks, blue potatoes and lots of other terrific veggies.  When I started my own garden (much much later in life) I obtained some of his strange onions.  
As grampa was born in Belgium, I always thought they were Belgian onions.  Much to my surprise I found out different.  Mind you, I hate to admit how many years I gave away "babies" all the while telling people they were Belgian onions.  Wrong!

Not many years ago I finally found out they are Egyptian Onions, also known as Walking Onions.
 Live and learn!  And to my surprise I find Wikipedia refers to them as "Egyptian Tree Onions".

File:Egyptian Tree Onion, Walking Onion, Topset Onion (Allium cepa var. proliferum).jpg 
This view of them kind of says it all.  Instead of setting seeds on the top of the stalks, they form a clump of small onions.  Bulblets?  
 
No matter what you call them, they are very interesting to grow.  As you can see from this picture the bulblets/babies/sets (whatever!) grow at the top of the stem, then often send another shoot out and form a second set of "baby onions".

So - now you are probably wondering what possible use these onions can be other than a good way to start a conversation when showing off your garden.

When the bulblets have formed in late summer, you can harvest them.  I think you might have a problem with trying to peel them to cook as they don't get very big.  The largest are sometimes the size of a penny, but many are the size of peas or smaller.  In the fall the main plant stems with the bulblets will die back, letting the bulblet cluster land on the ground.  Hence the term "Walking Onions" as they sort of walk away from the main plant, and when they land on the ground they will root and develop into a cluster of new young onions.  It might be spring when you notice them doing this.  The best way is to pick them as the stems start wilting and you can store them in a cool dry place and plant them very early .  OR as a better alternative you can separate them and  plant them in late summer.  Make sure the "pointy end"is up,of course, and don't cover them with dirt but just put them sort of half way into the ground.  They will sprout and be rooted and ready to go very quickly.  This gives you green onions much quicker than planting seeds.

One nice thing about these onions is they are very hardy.  They survived sub-zero weather in the Interior of B.C. (Quesnel) and didn't seem to suffer a bit.

When you plant a bulblet  you can either used it as a green onion or leave it to mature into a large hardy plant.  After the first year it will start to send up shoots around the main little bulb and then you will have a larger number of "main shoots"  to produce little bulblets.

So - my Grampa's onions are now spread all over the place.  I used to have a lot of large plants and passed them along through "Cowichan Re-Cycle".  I am sure he would be pleased to know his plants have survived the generations and are going strong.

If you want more information there a lots of images on the internet and if you just want to tell me if you have these and enjoy them, I would be happy to chat or exchange e-mails.

 GG
 

Monday, 3 September 2012

Lettuce & how it grows in the desert

L e t t u c e 

And how it grows in the desert

What wonderful stuff!  Lettuce goes with so many things and is so commonplace that it is taken for granted.  And there are so many varieties!  Lots of types, colours and some taste different than others.  Leaf, Romaine, Butter, and probably the most popular, - Iceberg.  The most popular colour of course is green but there are various shades of red too.
Much of the lettuce sold in stores is from either California or Arizona.
If you are interested in seeing how it is grown & harvested in Arizona, I am posting a number of pictures taken in the Yuma area.  Not interested? Yawn?  Oh well!  I am posting it anyhow! LOL
* * * 


Gourmet or "baby" lettuce - overhead irrigation.  Most crops are flood irrigated.
When the farmer wants to irrigate the field they call  the water district and order
water by the acre foot - meaning the field would be flooded to the depth they order
if the water was not soaking in as it floods.  Also the planting beds are raised so the
plants don't get covered with water.


Are you thinking "rain?" in the desert?  Well, yes, it does rain in the desert and when it does
rain it really does a job of it.  And even though the area is mostly sand & rock it DOES not soak
in right away.  When touring the area you will see a "dry wash" and even a river with no water in it.  But when it rains, those dry washes and rivers become raging torrents.


The trailer goes along beside the mower and the filled boxes are transferred from the mower to the transport vehicle.  The lettuce is then taken to the processing plant.


The lettuce is planted in two rows in each raised bed.
I know, I switched from leaf lettuce to head lettuce but I wanted to show a picture 
of how wet it gets in the fields.  Hard to do any harvesting in the rain - you can see why.


It is important to get the lettuce into the cool and on to market quickly.


A small hand operated forklift is used to move the stacks of crates of lettuce 
around inside the trucks.

* * * 
My next blog will be "Lettuce - Part 2"
and I will deal with head lettuce then.
* * *
If you find this interesting, please let me know
otherwise I am going to drop this idea.

I have dozens more pictures showing all the many crops being grown and how they  
are harvested in the Yuma AZ area 
GG