Saturday 25 July 2015

Tomato Plants - Propogation (2015)

Tomato Plants

Propogation

The other day I picked up a very nice publication called "Island Farm & Garden" which is published by Lesley Lorenz of Ladysmith B.C.  (lesley@islandfarmandgarden.ca) with a website at "Islandfarmandgarden.ca"...
Nice magazine, nice website but I only had a problem with information offered in one article.  The article was on page 24 of  the Summer 2015  issue and was entitled "Some Like it Hot"... referring to part of the article which was on peppers.  I agreed with the listing of the hotness of the various varieties of peppers - it listed  the Habanero as the hottest... Oh yes indeed!
However, in the same article it states "Pinch and remove suckers that develop in the crotch  joint of two branches.  They won't bear fruit and will take energy away from the rest of the plant."
Well, the suckers grow at the joint of a leaf and the main stem, not the crotch of two branches, and also they WILL bear fruit if you let them grow.  However, I believe they do take some of the energy away from the main plant and I have found I end up with many times more tomatoes but they don't get so large.  
Below are some pictures and comments that relate to this...


Below you can see the sucker shoot growing between the main stem and a leaf branch.
When it is this size you can snap or cut it out, then put it in some moist soil and keep it well watered and in a couple of weeks it will develop roots.  

Below you can see how well the plant is doing.  I start them in paper pots I make by rolling newspaper around a piece of dowel with a bit of tape to hold it together.
The newspaper breaks down and the roots go right through it.


Below is the plant (now larger) planted out beside my scarlet runner beans.
Last year I had a couple of plants in with the beans - one was a rooted cutting and the other was a volunteer that came from a seed in the compost.  They both produced quite well.
Mentioning Scarlet Runner beans reminds me I should tell you how I treat them.
I have a "teepee" made up of 4 steel fence posts driven into the ground and wired together at the top.  I plant the bean seeds at the base of the poles and they climb and climb, go crazy!
Last year I put 2 beans by each pole and we gave handfuls of beans away every few days.
This year I only put ONE bean at each pole.  They are again going to give us a crop we won't be able to keep up with.  Mind you, I have a secret that really seems to boost the crop size.
When the bean vines are about 3 feet (1 meter) high on the poles I nip the end of the vine.
The first time I did that I only did it on one of the 2 bean vines at each pole as I was not sure just how it would turn out.  I nipped the ends again this year and the vine sends shoots out at each leaf node (where the leaf joins the main vine) and the number of secondary vines just about overwhelms the "trellis" of poles.  (As you can see on the picture lower down)


 In this picture y0u can clearly see how much growth there is on the bean vines.  They make their way over to the pea trellis and also along a string about 4' to the wall of the greenhouse.  I end up nipping the ends off these secondary vines or they will go too far.  Once the vines are at the top of the poles I let them droop over a foot or so then nip them off.  You can see from the blossoms how well they are doing.
Getting back to the TOMATO plant from the sucker I rooted, I added 3 poles to help support it as it is now nearly 4' tall and still going.  I have not trimmed any suckers off it as we would like a larger crop of smaller tomatoes for canning.
.


 And in this picture you can see the tomatoes growing on my "sucker plant"... hard to see but they are there.  I will try to remember to add pictures of how they are doing next month.
 

 Have fun with your Tomatoes & Beans !!!


Monday 11 August 2014

August Update

AUGUST UPDATE

Time to update with a few pictures to show how things are doing.

 The sunflowers have really reached for the sun.  Blooms are forming nicely.
Behind the sunflowers the corn is hiding and we may have some to eat soon.
Off to the right the scarlet runner beans have gone crazy.  I didn't want them to try 
to grow 20' tall like they tried for last year so I nipped the end of the vines when they
got up to about 4 feet.  That did what I hoped - it encouraged the vines to send out new 
shoots at the leaf nodes and those shoots have developed lots of blossoms and now those
blossoms are forming hundreds of beans.  We are already having trouble keeping up with 
the supply by giving them to friends, but when the current 2" babies develop next week
we will have more beans than ever before.  All from eight (8) seeds !!!

 The tomatoes have really come along with the hot weather.  The ones in the picture are in the
greenhouse, were kept pruned of sucker shoots, and the tomatoes are lovely size.
The  2  plants I put outside next the the greenhouse were left un-pruned but they got to such
a tangle I had to start pruning at least some of the suckers shoots off.  They are hard to see
in all the growth, but one of the plants have in excess of 30 tomatoes on it.   They are decent size
but not nearly as big as the ones shown above.  One other plant outside (not shown) is doing very
well, has a number of tomatoes on it and we are wondering what variety they are as this was a 
volunteer that must have been a seed in compost or ???  Anyhow, it just appeared as a sprout
and even half covered by the bean vines it is groaning under the weight of the tomatoes on it.


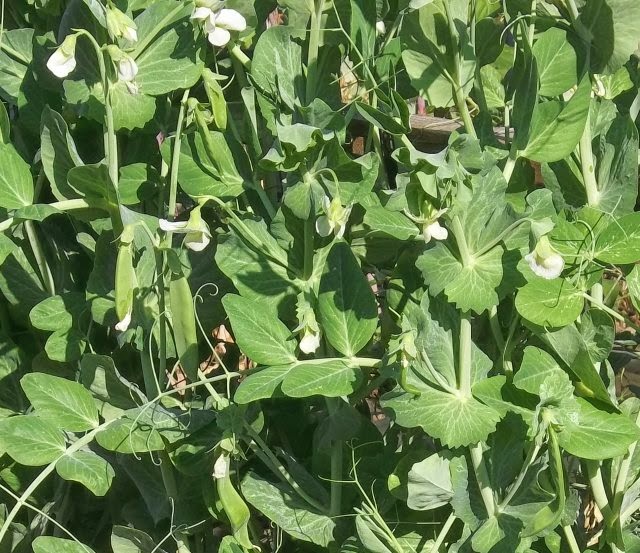
This is the latest batch of peas.  Fourth planting!  First one was in the greenhouse, then two plantings between the runner beans and the tomatoes next to the greenhouse.  Good production off the second planting but the third one which was on the other side of the wire support from the second planting seems to have been held back by the growth and shading from the beans.
I thought I was going to be smart and put a row of beets in between the beans and the peas but that sure didn't work out.  They ended up in total shade and didn't like it, didn't grow more than a couple of inches of tops.  Once the peas were gone and I trimmed some of the bean leaves back and gave them a drink of fish fertilizer they have started growing again.  Going to be a while!

* * *

I am rather disappointed in my greenhouse covering.  It was vapour barrier with UV inhibitors to make it last in the sun.  Well, it is starting to break down from the sun.  And the greenhouse we left at the old house 3 years ago looks like it is still holding up and we had used it for a number of years before we moved.  Must have been a different batch of plastic or something.
So - in the spring I will be looking at replacing the plastic.
I considered using coroplast sheets - more expensive but should, repeat should, last longer.
Problem is, not only is the plastic itself expensive but I would also have to put something like 
1x3 cross slats on the rafters to support it.  More expense so maybe I will try for a different
brand of that 6 mil, UV inhibited, vapour barrier.

* * *
That's it for now!
GG


Sunday 27 July 2014

Plus one month

Plus one month

Amazing how much the corn, sunflowers and beans have grown

since the last posting a month ago!


Thursday 26 June 2014

June 26 Update

June 26th - Update

What a difference 12 days makes!

* * *

Overview of back yard from patio


 Carrots, tomato plant, bush beans, dwarf peas
Yes, "bush" beans and "dwarf" peas that
were only supposed to grow about 24" high!
The only thing I didn't have to cut the tops back on
were the carrots!


As you can see, the dwarf peas went crazy, the scarlet runner pole beans are at the top of the poles and have been "topped" but are still growing!  The nice thing is that they are producing loads of pea pods that will soon be ready to eat.  The tomato plants I put in and didn't prune have gone mad!  Such a jungle I can't see anything in there.  Grew them without pruning one other time and they produced a huge crop of smaller tomatoes.  We hope they do that this time as we could us some for canning.   


When I look at how much the corn, sunflowers and cosmos have grown in12 days I am amazed.  I had trouble with the row of beets.  Birds got in and were scratching for bugs and rooted a bunch of them out so I had to add some protection.
To the right of the raspberries I added another framework and planted more "bush" peas.  Considering how much the others have grown I might have to extend the supports.


 Yes, that  is a step ladder!
I have to use it to reach the raspberries at the top!
Next year I will cut the canes off lower.  Live and learn!


 Poppy likes to lay in the sun and guard the garden against starlings.
She never catches them but sure does try!


 The poppies don't last long but now the Japanese Iris is looking good.  Soon time to trim back the plants that have finished blooming.


 Overview of the back of the house.  The aluminum canopy sure has been a blessing, keeping the patio dry and shaded.

The small canopy on the right is an 8x10 over the hot tub.


And that is about it for now!

GG 

Saturday 14 June 2014

Mid-June update

Mid-June Update

Time for an update of what is happening in the garden.
Every day I go out and look around to see how much change there is and wonder why it seems to be slow to grow.
I guess it is sort of like a cook wondering if the pot is going to finally boil!
So - here are some pictures to show what has been accomplished so far this season.

 Our first pink oriental poppies that we have had for many years.  Delicate as tissue paper, beautiful but the blooms too quickly fade and drop.

 We found another pink oriental poppy that, as you can see, is a much brighter pink but otherwise same variety.

A close-up lets you see why we like this one!

* * * 

The flowers at the front of the house are doing nicely
but the lavender (bottom of picture) is trying to take over!

* * *
 The pictures below of the greenhouse will give an idea of what a difference there is between June 1st and 14th.  The carrots are growing fast but not nearly as fast as the bush beans.  I had to check the package of seeds to make sure I had picked the right ones and yes, on the package it says "grows to 24" tall" - but they have gone right up to the roof.  The ones in the outside bed are also over 5' tall!


* * *
Overall picture of the "back garden"

 The new raised bed is showing promise.
Far end - corn...I hope it doesn't attract the raccoons!
In the middle are two Blueberry bushes.  Two varieties so the crop is spread out over a longer period of time, one is supposed to have large berries and the other BIG berries - as big as cherries we were told.  Time will tell.  In the center of the front half of the bed are a couple of volunteer potato plants (thanks to the compost under the topsoil)... and at the front are a half dozen sunflowers (as requested by somebody named Ashley)...  and sprinkled around the bed are Cosmos flowers that are doing nicely.  One of my favourites.
(or favorites if you are in the U.S. of A.)

 As per the tag in the picture - this is the main raised bed June 1st.
Below is the same bed today - June 14th.
 The scarlet runner beans are 3 or 4 feet up the poles, the peas, well, I had to add on to the posts and put twine across for the "bush peas" to climb up on.  Now about 6 foot tall!  Not bad for 24" bush peas.  The tomato plants have kind of gone wild between the peas and the greenhouse but I thought I would let them go to see how many smaller tomatoes they would produce compared to the ones inside that I keep pruned (remove the shoots that come where the leaves join the main trunk)...  And - somewhere between the two tomato plants is a lonely squash plant.  This year it is "butternut" instead of the usual "sweetmeat"Going to be interesting to see how it compares in flavour(flavor)  (U.S. version - LOL)  
* * *

The inside of the greenhouse got too hot again this year.  (That was when we were having sunshine instead of clouds, wind & showers like now)  So - the shade cloth went back up on the roof.

Last year our strawberries went wild and the whole bed was choked with plants.  I cleaned out a lot this spring, now some have died or are in the process of doing so, and the crop is really meager.  
It looks like the raspberries are going to produce a bumper crop that will make up for it!

We missed having blackberries after being spoiled with bumper crops of them at our previous home so we bought a plant and will be training the vines along the back fence.  However, this time we went with a THORNLESS blackberry.  Variety name "Marionberry"

Will try to give progress reports every now and then...
GG


Saturday 24 May 2014

Update - Spring 2014

UPDATE

Spring - 2014

Time to spend a little time on this blog I guess.  Been too long since I posted anything so here goes!

PEAS
The peas in the greenhouse are growing like crazy and the wire frame they grow up works great.  Seeing as peas don't mind cool weather (probably prefer it to the hot greenhouse) I decided to put up another frame with fence wire, this time in one of the outside raised beds.
I put the plastic strips up as protection as we had some nights that were at or close to the freezing point when I put the seeds in.   The way the plastic is in the closest strip is how it was when the seeds were first planted.  Doing this helps the soil warm up more during the day and slows the cooling overnight.  After the peas were well up I raised the plastic higher which not only protected the peas from cool night air but let sunlight in during the day and also helped to guide the peas onto the wire.

 After the peas grew beyond the plastic strip I removed it and let the air get to the plants.  You will notice there are peas showing only on the side of the wire closest to the greenhouse.  On the opposite side I had planted peas and covered them (top picture) until they were nicely sprouted and through the ground. I then let them have full sunlight and air as the outside temperature has now risen and all the plants are growing well.  Between the peas and the greenhouse you can see 2 tomato plants and between them is one lonely little squash plant.  This year we are trying out "Butternut" squash as they are smaller than the "Sweetmeat" that we grew the last couple of years.  For only 2 people you don't really need a huge harvest!
 * * *

RAISED BEDS

The raised beds have really worked well for the raspberries, strawberries and also the pole beans.  (And anything else we planted in them!)  So, it seemed logical to add another one! 
Using 9 landscape ties I made a 4x8 bed, 3 ties high, and the cost was quite reasonable.  Probably $75 +/- ...  including the ties and the galvanized ardox spikes holding them together.  
If you use this method, don't forget to overlap the corners and alternate them to hold it all together.  (see picture below)  I used 6" ardox nails and drilled 1/4" pilot holes so there was no splitting of the ties.

 
Not sure what we will plant in the new bed but it gave us a place to put all our excess compost.  And we have now covered an area of the lawn that was getting "spongy" due to it being where there used to be a huge tree that had the stump ground up and the grindings left to rot.  Previous owners thought it would just vanish I guess.
Maybe we will try some corn or even sunflowers. 

If anyone has any questions or comments please feel free to e-mail me!

Grumpy Gramps

GREENHOUSE ALERT

GREENHOUSE  ALERT

WARNING REGARDING PLASTIC MATERIAL FAILURE


Sorry for not posting much for a while, didn't have much new info but I just found a problem I thought you should know about.
My greenhouse was built in 2012 and I thought the plastic vapour barrier I used to cover it would be good for at least 5 or 6 years as the material I used at our previous residence had been in use for at least 5 or 6 years and it was still in good condition when we moved.  It appears to be still in use there now!
HOWEVER - when I was in the greenhouse the other day I looked up and noticed the plastic on the roof is breaking down, has holes in it!  I have checked and it is "normal" vapour barrier with UV inhibitors in it so - maybe there has been a change in regulations as to what or how much inhibitor is now in it.

In any case, I am sure it will last over the summer and if not, then it can just let some rain into the greenhouse - no problem!

My next step was to check and see if there were different qualities of vapour barrier.  I could NOT find any information to show there may be different plastics/inhibitors etc.

SO - what to do?  I thought about using corrugated clear fiberglass panels.  Seemed like the smart thing to do.  But there is always a "catch" - something to watch for.  
The panels come in two weights/thicknesses.  
The lightweight would cost about $150 plus cross strips for the corrugations to fit into and support it.  From what I see on some blogs this material is too light and cracks very easily - to the point of being hard to handle without breaking it.
The heavy weight would cost about $350 plus cross strips.

The alternative is to replace what is there with the same poor stuff.  The cost of a 59 foot roll by 102 inches wide is about $40 plus tax.
This means I could re-cover the roof three times with one roll.  I think the walls will hold up a little longer than the roof as they don't get the sun beating on the as badly as the roof does.  

So - it looks like I buy the $40 roll - works out to about $15 per covering which is much more bearable than the expensive fiberglass panels.

Next I am going to have to do some research into the vapour barrier that is available to see if there is something out there somewhere that will last longer than 2 years.  It USED to last longer!!!

Could it be that the manufacturers like it to break down sooner so they can sell more?  NO NO NO!  The wouldn't do that would they?


Sunday 3 November 2013

HEAD LETTUCE Growing in Arizona fields

HEAD LETTUCE

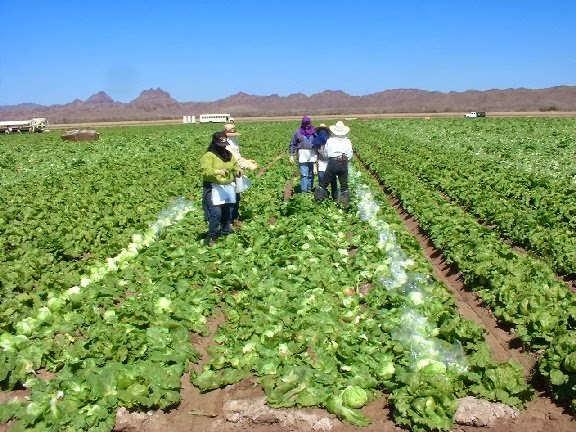
I have had a request for more information about lettuce.  When I did the last post about lettuce I said I would post information about head lettuce.  Well, I guess it is about time to "make good" my promise - or was it a threat?  In any case, I now offer some pictures and information about how they grow head lettuce in Arizona.  My pictures were taken in the Wellton, AZ area.
* * *


 If you can make it out the caption is "Massive field of head lettuce".
Actually, this is not a really big field.  Bigger ones are grown south of Yuma, they are 
visible from Highway 95 that runs to the Mexican border.


In the foreground is the remnants of harvested lettuce which will be plowed under.


Only the highest quality lettuce heads are bagged then boxed.
Lower quality heads are just put in boxes, not bagged first.
Very low quality heads or heads that are too large for marked are put in very large
containers (about 3' deep and 4' square)


Even in the heat the workers wear hats, scarves & long sleeve clothing to protect from
sunburn and possibly chemicals.


 Close-up view of the bagging station.  Loaded boxes go onto the trailer and when it is fully loaded the trailer is pulled from the field to the roadside where it will be taken by truck to a cooling station at the packing plant before being shipped all over the country & to Canada


 Lettuce quality is judged by many standards including size.  If there are many heads not quite large enough for market they field may be picked a second time a while later.  If the heads are too large for market (retail sales like grocery stores) then they will go into the large bins where they are washed & chopped up for bulk sales.  (perhaps your favourite salad bar?)


The cooling plant shown in the pictures above was in use in Wellton AZ when the pictures were taken but it was dismantled a few years ago and the trailer loads of lettuce are now trucked in to Yuma to be processed.  (A trip of about 30 miles)

I think that is enough about lettuce - I will try to post other crops soon.

Mo